Thursday, February 16, 2012

February 2012: Valentine's


This year we were all individually inspired to do the same thing. So collectively, we worked away to make a bunch of poms then shared our work with each other to form these lovely heart wreaths. Martha Stewart had a great, elaborate and inefficient way of tackling this project, so we simplified it. Instead of hanging 25 individual removable hooks to our wall/door, we adhered the poms to a cut-out from foam core board, so we would have to reassemble our hearts every year.....

Sorry Martha... but, DUH.

Everyone's turned out different, and lovely.

Supplies:

Foam Core Board
Exacto knife/scissors
Lots of tissue paper
Wire
Hot Glue

1. Cut out your heart, whatever shape your heart desires
2. Cut out multiple layers of tissue paper into stacks of squares, varied sizes (4x4, 6x6)
3. Accordion the layers (about 6-8 layers) of tissue paper, then wrap a small piece of wire around the middle and start pulling layer by layer to make the poms, this is kind of haphazard. You may also scallop the edges, if you like the look
4. Hot glue the poms onto you heart, the way that pleases you best

Friday, October 14, 2011

Halloween 2011

For some reason- Halloween seems to be the consistent season of crafting. We had two really fun ideas and both turned out great. One was found on Pinterest, from "Not So Idle Hands," and another Sara found that was quite a pleasant surprise. Lace-covered, spray painted pumpkins.

First was the glow in the dark one, using a pizza pan, multiple paints, and cut out glitter-foam bats, or witches. Many layers of glow in the dark paint were necessary to get it to show up, but with a black light- those babies shine like the real thing. Tonight I'll put the light on it and take a picture, so stay tuned for an update. But here it is in normal daylight:


Super cute, and looks good day or night. Then, we did the pumpkins. I can honestly say I didn't put my best foot forward, but after seeing the result, I wish I had. But still, look how cool:


So go out- get some pumpkins, spray paint, and lace- and go nuts. Send pictures.

Happy Halloween!

(Click on link "Not So Idle Hands" to get info on how to make the first one.)

Thursday, September 15, 2011

Jam Project


Two Bags of Frozen Raspberries


3 or 4 Plums, Peaches or Pears.


One box of Sure Jell Pectin


6 Pint Jars (they come in packs of 12, so we can split them)


Lots of Sugar (but not too much, we are doing low-sugar jam)


One orange or lemon for juice and rind


Estimated cost:

Raspberries $8
Pears/Peaches/Plums $2
Sure Jell $2.50
Sugar $3
Orange/Lemon $1
Jars (if halved) $4
Total: about $20

Put berries in a large pot and break them down. Cut up other fruit and add it and sugar. Once boiling, add pectin and lemon juice bring again to a boil. When the mixture has reached a "syrupy" consistency, and coats a metal spoon, then it is ready to be canned. Pour (Carefully!) into the sanitize jars till 1/4 inch from the rim. Wipe rims and put the lids that have been warmed in almost boiling water then tighten the ring to ALMOST completely shut, leave a little wiggle room. Put the jars into a boiling water bath till they are submerged, and leave for 25-30 min. Carefully- remove jars and tighten lids. When you hear popping, you know the lids are sealing correctly. Jam has a shelf life of 2 years, and if opened and refrigerated, 2 weeks.


Tuesday, September 13, 2011

Bracelet


I did this all summer long. Some bracelets I got the ideas off of Craftgawker, and others I just plain made up. This one, (shown in blue above) is made up. Here is how to do it-

1. Cut a line of hemp that is three times as long as the length you want your bracelet around your wrist. Pick 2 or 3 colors of embroidery floss and cut them 2 ft long. fold in half, so the loop of hemp becomes the top (and later to be the button hole) and make sure the embroidery floss is even. Tie a knot at the top, and make sure it fits around your button.

2. Keeping the hemp lines parallel, weave the embroidery floss in and out, from one side around to the other. You'll feel like you are braiding, except not- because you are weaving the floss around the stationary hemp lines.

3. As you go, squish the thread up so the hemp is covered, and keep going.

4. When you get to the length you desire, tie the bottom in a knot, then snip the ends of the embroidery. Then, thread the hemp through your button, knot, and cut. Now your bracelet is removable. And you are quite finished.


note- some of the bracelets on my wrist above, I didn't squish the thread on, and left the hemp visible. Just for contrast.

Tuesday, August 9, 2011

Copy of a Copy

I came across THIS post, and though I think she did a great job (especially because painting straight lines is nearly impossible..) I was still more impressed with the original. Which, by the way, is digitally produced. So I took a crack at it, and this is what I came up with:

If I had maintained the patience to be more cautious of the straight lines, it would have turned out better.

But still..

Friday, August 5, 2011

A Bit of my Summer Bracelet Craze


If you REALLY need a tutorial, I'll give one. But I made these up and it's a pretty simple concept.

Saturday, July 2, 2011

Summer Craft Result


We did a small, informal night of crafting for the button monograms. They all turned out great, I didn't have my camera to capture everyone's, but here is my finished product. The problems that arose were:
-the trace lines of the letter being visible
-the paper warping
-the buttons causing issues with glass plating

Other than those teensy (yet humongous, the warped paper is driving me nuts...) problems, I like the completed product.

Saturday, May 21, 2011

Summer Craft Night Nominees


4th of July wreath courtesy of First Lady of the House. You can never have too many wreaths, (that should be the motto of "Craft Night") but this one would be strictly Holiday, whether it be Memorial Day, or during the July patriotic days, it is cute, fun and I have a feeling everyone's will look different due to each person's creative abilities...


(Courtesy of spearmint baby)
This is cute whether it be for your own name, your last name, or your kid's name. I love it. It's bright and colorful, which are two things that always make my list. We'd have to buy the frames, which are most likely 10-15 bucks at IKEA. Then all the buttons. You can buy bags of random buttons at craft stores, then she also uses brads, and other miscellaneous do-dad's.


Pear-Raspberry Jam. Oh yumminess. Would make these the REAL way, with pressure cooking and all, or- we could just make freezer jam and put them in plastic containers. It's SO SO good, lasts for SO long (either way, freezer or shelved jars) and it's really easy. Items needed would be raspberries (frozen work fine) and sugar, pectin and jars. Bada-boom. Domestic Goddesses.


If you have more ideas, send them to me and I'll post them here. Then we can decide what our summer craft will be.....

Friday, April 8, 2011

April 2011: Easter


These bunnies were created from an internet search of "felt bunnies." I came across lots of ideas, some included sewing machines, or needle felting; things I did not want to do. So I reinvented the felt bunny and used felted wool, the blanket stitch and cotton ball tails. Simply cut out two pieces of felted wool in bunny shape, then use embroidery thread to make little eyes. Then, blanket stitch around the two pieces put together, starting below the bunnies tummy at the bottom corner. Stitch up until about a half inch up the ears, then separate the ears and continue up the side of just ONE ear. When you get back around that ear to the same spot that you separated at, cross over- and go up the other side of the OTHERear, so when you get back around you will put the pieces back together and continuedown the bunny closing the felt together. The ears should sit kind of floppy. Then, stitch on the tail, and fill your bunny with batting (or and easter egg...)

Even Jack, the french bull dog had a good time.


(They sit gathered together, above my easter egg garland, found here)

Supplies:

Felted Wool
Fabric Scissors
Embroidery Thread
Cotton ball tails
Batting
Needle..


Tuesday, April 5, 2011

In the meantime...

I came across this idea on one of my favorite sites but sadly I am not chic enough to have my own book of Pantone paint chips. I finished my OTHER Easter craft, and with the leftovers, I decided to make my own magnets. So this is what I came up with. I LOVE them... so much. I may make a million more.


I used wooden discs that I bought, all ready cut for me. I used them to measure the cut outs for the paint chips and the magnetic sheet. I glued the chips on, then used paper glaze to make them shiny and almost edible looking... then glued the magnet to the back. I'm pleased. Anything colorful makes it on my to do list. I have a feeling there will be many more paint chips in my future...


Materials:

Small wooden discs ("Woodsies")
Elmer's Glue
Paper Glaze
Paint Chips
Magnetic Paper

Cut out your circles, glue them to the disc, glue magnet to the BACK of discs, then glaze and let dry. Hang on anything metal, prevent kids from trying to eat them..

Monday, March 21, 2011

Easter Craft

I promise to get a better photo up... but this little bunny was the prototype, so he was captured by my phone. You get the idea.

Saturday, January 29, 2011

January: Valentine's 2011

I'm trying to figure out if this is really aValentine's Craft or not..It doesn't really matter. Everyone showed up (and then some) and all their wreaths were beautiful. We did two types, one was burlap and the other fabric flowers. This night was particularly special because it was our first Craft Night at Sara's new house. It was the perfect amount of space. Thank you again, Sara, for allowing us into your brand new home.

These fabric flowers are so fun to use for any number of these, not to mention pretty easy to put together. It's just a matter of twisting, keeping your fingers on the flower and using the Liquid Stitch to keep it together. After many, many flowers, your fingers do tend to get sticky, so washing them now and again will help prevent the flower from sticking to your finger instead of itself.

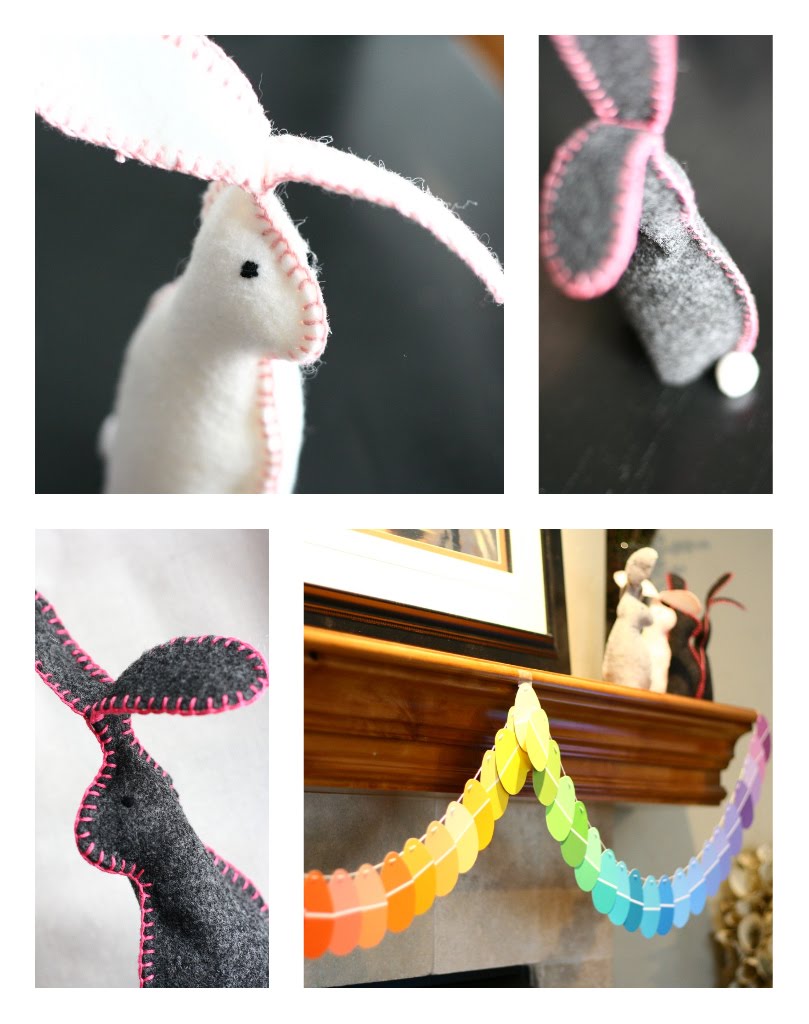
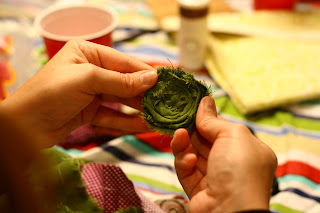
Obviously, the more fabric you use, the bigger the flower, but these strips of fabric are about 2 inches wide and ranging from 1-3 feet long. IF you finish a flower and want it to be bigger, just glue more of the strip onto the back and continue twisting. Some girls made HUGE flowers and they turned out very pretty.


We had quite a lot of fabric and everyone shared and exchanged, making the options limitless for our end results. In regards to the burlap wreath, some used the traditional beige burlap and others had black, red and dark brown. They added a whole new look to the original craft and it was fun to see people do what they wanted.

The burlap does shed, so be prepared to have it all over you.
For our little 14" wreaths we averaged about 40 of the "burlap flowers" per wreath and it came out just right. People used different kind of brads and everyone's turn out great according to their original style.

SUPPLIES:

Fabric Flower Wreath
Grapevine wreath
Fabric
Liquid Stitch
Hot Glue

Burlap Wreath
Green Wreath Form
Burlap
Fabric
Brads
Hot Glue
{Burlap wreath found at Tatertots and Jello}

Tuesday, January 25, 2011

December: Christmas 2010

Again, Martha contributes to my life bringing joy and frustration. I learned how to do these snowflakes about 6 years ago. But they are always impressive and I love how they all turn out differently. Using 12-14 white paper lunch sacks, you trim about 1" off the bottom of the bag (while still folded flat.) Then you tape the sides of the bags together with three pieces of scotch tape, and do the same to the other side. Once all the bags are taped (creating a sort of lunch bag accordion) you may start cutting shapes out. I usually go 2-3 bags at a time, depending on how strong your scissors are. Cut in the spaces between the tape and when finished, bring the bookend bags around till they touch each other and the accordion forms a big, round snowflake. Tape those two bags together on each side, and display. Then cut those pieces again and fold back up to store.

(If you are interested in more detailed instructions, email me. This is involved..)

SUPPLIES:
14 white paper bags
Scissors
Scotch tape
1-2 hours of your time

Monday, October 25, 2010

October: Halloween 2010

These guys I almost feel like I need to apologize for. Though they are cool, I'm not sure if they are worth the constant mess and the continuous shedding. These masks were only $2.50 at Michaels, and they were pretty sweet. Of course I thought of Martha Stewart Glitter, and with my spray glue it all seemed to come together. But you need a hefty load of VERY EVENLY DISTRIBUTED spray glue, and you need to be prepared for the glitter to be EVERYWHERE and always fall off every time the mask is touched.

SUPPLIES:
Papier Mache' mask
Spray glue
Martha Stewart Glitter
Patience.

Friday, February 5, 2010

February: Valentine's 2010

These simple hearts reflect the Easter Craft we did this year at Keisha's house, which I don't have pictures of. They are simply scrapbook paper cut into heart (or egg) shapes, then folded in half and either SEWN together, or in my case, glued. The ones I sewed together failed to hang straight. These can be all sorts of sizes and colors. Be free.


SUPPLIES:
Scrapbook paper
Scissors
Heart/Egg Shape for tracing
Glue sticks
String

Sunday, October 18, 2009

October: Halloween 2009


The day Martha Stewart glitter entered our lives. This stuff is glorious, fine, and beautiful to look at. However, it has now become know as the "herpes of crafting" because it is impossible to clean up. But it sure is pretty.

These are real pumpkins, painted with a mixture of elmer's glue and water, then showered with glitter. They will last through Thanksgiving for sure.

Artificial pumpkins may be used as well. Be sure to cover the pumpkin thoroughly with the glue wash, and having a stem makes it easy to maneuver the pumpkin around as you shower it with glitter.


SUPPLIES:
Pumpkins (real or fake)
Martha Stewart Glitter
Elmer's glue wash (3 parts glue, 1 part water)
Foam paint brushes

Thursday, April 2, 2009

April: Easter 2009

Another family activity, though the girls from Craft Night did this as well- the ever so fun, modge podge eggs. This can be a messy task, but if done right, these can last forever (as long as they aren't broken.)

Poking holes on the top and bottom of the egg, being sure to pierce the yolk inside, makes it possible to blow the entire contents of the egg OUT, thus leaving a delicate shell. These can be dyed, or as we did, modge podged. After clipping shapes and strips out of various colors of tissue paper, modge podge is applied to the shell to create adhesive for the tissue.
Then you can decorate the egg with all the tissue you may
desire, then you carefully paint the egg again in modge podge.

Sometimes this is easier if the midge podge is thinned, like the elmer's glue wash. The tissue is VERY delicate once wet and painting them could tear them. Use a soft brush, and be cautious of the pressure you are applying.

Let them dry and these eggs will be with you for many Easter's.

SUPPLIES:
Eggs
Thick needle or pin
Tissue paper
Modge Podge (diluted with water)
Soft paint brushes

Tuesday, February 10, 2009

February: Valentine's 2009

God Bless Martha Stewart.

These crayon hearts have been a part of lots of my Valentine's. They are darling alone, but even more darling together. These are simple, fun and very pretty.

Crayon shavings, with shades of red, orange and pink are spread between two sheets of wax paper, then using a warm iron, blend the colors together to get a 'stain glass' effect. The more shavings there are, the darker the colors.

Be sure to wipe your iron thoroughly with a paper towel after using it on the wax paper, because it does bleed through the wax paper. I found this out the hard way.


SUPPLIES:
Crayons
Wax Paper
Iron
String
Wooden dowel

Saturday, December 20, 2008

December: Christmas 2008

Christmas Craft was with the family this year. We made these very darling, (very INVOLVED) advent calendars.

Using mini muffin tins, we designed each day with scrapbook paper, stickers, bows, buttons, bells and numbers. Then adhered those 24 calendar days to magnetic sheet. Sticking them on the tin creates a "pocket" inside to hide treats or messages.


This Crafting Day also included out favorite "family treats" from a few individuals. The most memorable, were the pretzel turtles, made with mini pretzels, Rolo's and pecans; then the magical rice puff treats with honey and chocolate. Yum.

SUPPLIES:
Mini-muffin tin
Magnetic sheets (with adhesive on one side)
Scrapbook paper
Circle dye cut (this makes it much easier..)
Decorations (ribbons, buttons, stickers, etc.)