
 I'm trying to figure out if this is really aValentine's Craft or not..It doesn't really matter. Everyone showed up (and then some) and all their wreaths were beautiful. We did two types, one was burlap and the other fabric flowers. This night was particularly special because it was our first Craft Night at Sara's new house. It was the perfect amount of space. Thank you again, Sara, for allowing us into your brand new home.
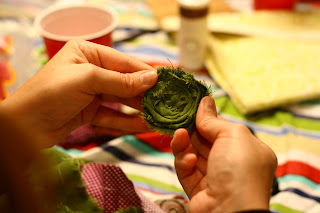
These fabric flowers are so fun to use for any number of these, not to mention pretty easy to put together. It's just a matter of twisting, keeping your fingers on the flower and using the Liquid Stitch to keep it together. After many, many flowers, your fingers do tend to get sticky, so washing them now and again will help prevent the flower from sticking to your finger instead of itself.
 Obviously, the more fabric you use, the bigger the flower, but these strips of fabric are about 2 inches wide and ranging from 1-3 feet long. IF you finish a flower and want it to be bigger, just glue more of the strip onto the back and continue twisting. Some girls made HUGE flowers and they turned out very pretty.
We had quite a lot of fabric and everyone shared and exchanged, making the options limitless for our end results. In regards to the burlap wreath, some used the traditional beige burlap and others had black, red and dark brown. They added a whole new look to the original craft and it was fun to see people do what they wanted.

The burlap does shed, so be prepared to have it all over you.
For our little 14" wreaths we averaged about 40 of the "burlap flowers" per wreath and it came out just right. People used different kind of brads and everyone's turn out great according to their original style.
SUPPLIES:
Fabric Flower Wreath
Grapevine wreath
Fabric
Liquid Stitch
Hot Glue
Burlap Wreath
Green Wreath Form
Burlap
Fabric
Brads
Hot Glue


