Sunday, October 18, 2009

October: Halloween 2009


The day Martha Stewart glitter entered our lives. This stuff is glorious, fine, and beautiful to look at. However, it has now become know as the "herpes of crafting" because it is impossible to clean up. But it sure is pretty.

These are real pumpkins, painted with a mixture of elmer's glue and water, then showered with glitter. They will last through Thanksgiving for sure.

Artificial pumpkins may be used as well. Be sure to cover the pumpkin thoroughly with the glue wash, and having a stem makes it easy to maneuver the pumpkin around as you shower it with glitter.


SUPPLIES:
Pumpkins (real or fake)
Martha Stewart Glitter
Elmer's glue wash (3 parts glue, 1 part water)
Foam paint brushes

Thursday, April 2, 2009

April: Easter 2009

Another family activity, though the girls from Craft Night did this as well- the ever so fun, modge podge eggs. This can be a messy task, but if done right, these can last forever (as long as they aren't broken.)

Poking holes on the top and bottom of the egg, being sure to pierce the yolk inside, makes it possible to blow the entire contents of the egg OUT, thus leaving a delicate shell. These can be dyed, or as we did, modge podged. After clipping shapes and strips out of various colors of tissue paper, modge podge is applied to the shell to create adhesive for the tissue.
Then you can decorate the egg with all the tissue you may
desire, then you carefully paint the egg again in modge podge.

Sometimes this is easier if the midge podge is thinned, like the elmer's glue wash. The tissue is VERY delicate once wet and painting them could tear them. Use a soft brush, and be cautious of the pressure you are applying.

Let them dry and these eggs will be with you for many Easter's.

SUPPLIES:
Eggs
Thick needle or pin
Tissue paper
Modge Podge (diluted with water)
Soft paint brushes

Tuesday, February 10, 2009

February: Valentine's 2009

God Bless Martha Stewart.

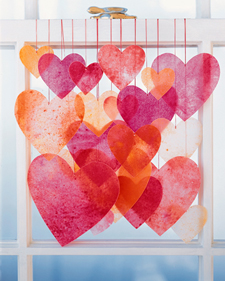
These crayon hearts have been a part of lots of my Valentine's. They are darling alone, but even more darling together. These are simple, fun and very pretty.

Crayon shavings, with shades of red, orange and pink are spread between two sheets of wax paper, then using a warm iron, blend the colors together to get a 'stain glass' effect. The more shavings there are, the darker the colors.

Be sure to wipe your iron thoroughly with a paper towel after using it on the wax paper, because it does bleed through the wax paper. I found this out the hard way.


SUPPLIES:
Crayons
Wax Paper
Iron
String
Wooden dowel